| Tenouk C & C++ | MFC Home | Menus, Key Acc., Rich Edit & Property Sheets 1 | Menus, Key Acc., Rich Edit & Property Sheets 3 | Download | Site Index |
Module 7 two: Menus, Keyboard Accelerators, the Rich Edit Control,
and Property Sheets – Part 2
This is a continuation from the previous module... Program examples compiled using Visual C++ 6.0 (MFC 6.0) compiler on Windows XP Pro machine with Service Pack 2. Topics and sub topics for this Tutorial are listed below:
-
The MYMFCPRO Program Example
The MYMFCPRO Program Example
This example illustrates the routing of menu and keyboard accelerator commands to both documents and views. The application's view class is derived from CView and contains a rich edit control. View-directed menu commands, originating from a new pop-up menu named Transfer, move data between the view object and the document object, and a Clear Document menu item erases the document's contents. On the Transfer menu, the Store Data In Document item is grayed when the view hasn't been modified since the last time the data was transferred. The Clear Document item, located on the Edit menu, is grayed when the document is empty. Figure 5 shows the first version of the MYMFCPRO program in use.

Figure 5: The MYMFCPRO program in use.
If we exploited the document-view architecture fully, we would tell the rich edit control to keep its text inside the document, but that's rather difficult to do. Instead, we'll define a document CString data member named m_strText, the contents of which the user can transfer to and from the control. The initial value of m_strText is a Hello message; choosing Clear Document from the Edit menu sets it to empty. By running this example, you'll start to understand the separation of the document and the view.
The first part of the MYMFCPRO example exercises Visual C++'s wysiwyg menu editor and keyboard accelerator editor together with ClassWizard. You'll need to do very little C++ coding. Simply follow these steps:
|
|
Run AppWizard as in the following steps.
Figure 6: AppWizard new MYMFCPRO project creation dialog.
Figure 7: AppWizard step 1 of 6 dialog, selecting SDI application with Document/View architecture support. |


Figure 8: AppWizard step 2 of 6 dialog.

Figure 9: AppWizard step 3 of 6 dialog.
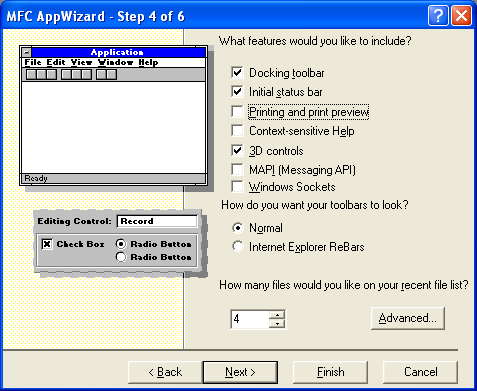
Figure 10: AppWizard step 4 of 6 dialog, deselecting Printing and print preview option.
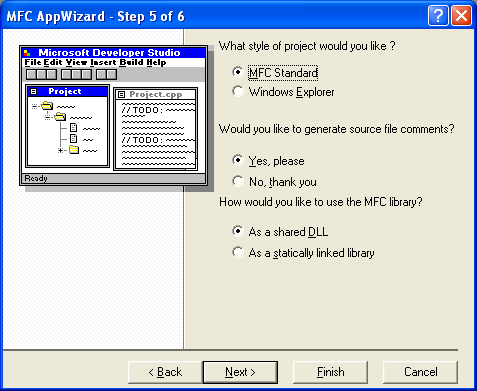
Figure 11: AppWizard step 5 of 6 dialog.

Figure 12: AppWizard step 6 of 6 dialog.

Figure 13: MYMFCPRO project summary.
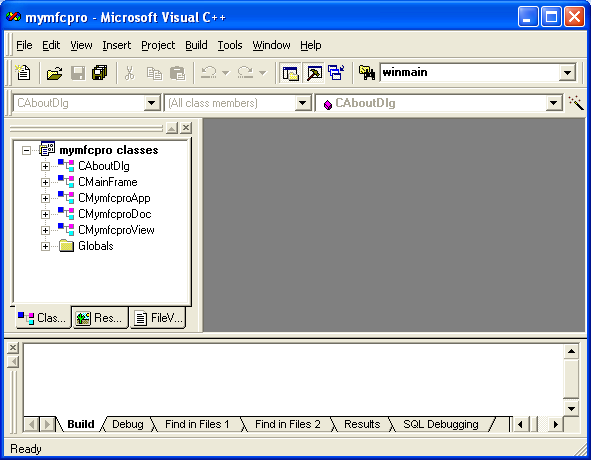
Figure 14: MYMFCPRO project IDE launched.
Use the resource editor to edit the application's main menu. Click on the ResourceView tab in the Workspace window. Edit the IDR_MAINFRAME menu resource to add a separator and a Clear Document item to the Edit menu, as shown here.
|
Menu |
Caption |
Command ID |
|
Edit |
Clear &Document |
ID_EDIT_CLEAR_ALL |
|
Table 1 |
||

Figure 15: Using the resource editor to add a separator.

Figure 16: Using the resource editor to add Clear Document menu.
Now add a Transfer menu, and then define the underlying items. Using the mouse, drag the blank item to the insertion position to define a new item. A new blank item will appear at the bottom when you're finished.
Figure 17: Using the resource editor to add a Transfer main menu.
Use the following command IDs for your new menu items.
|
Menu |
Caption |
Command ID |
|
Transfer |
&Get Data From Document\tF2 |
ID_TRANSFER_GETDATA |
|
Transfer |
&Store Data In Document\tF3 |
ID_TRANSFER_STOREDATA |
|
Table 1 |
||
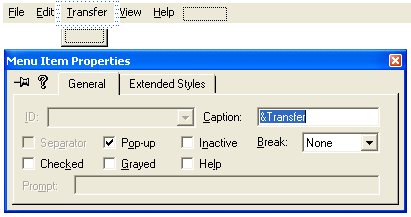
Figure 18: Adding and modifying the Transfer menu properties.

Figure 19: Adding and modifying the Get Data From Document menu properties.
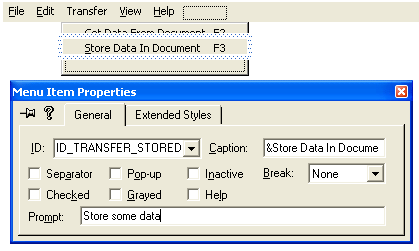
Figure 20: Adding and modifying the Store Data In Document menu properties.
The MFC library has defined the first item, ID_EDIT_CLEAR_ALL. Note that the \t is a tab character, but type \t manually; don't just press the Tab key.
When you add the menu items, type appropriate prompt strings in the Menu Item Properties dialog for the Prompt. These prompts will appear in the application's status bar window when the menu item is highlighted.
Use the resource editor to add keyboard accelerators. Open the IDR_MAINFRAME accelerator table, and then use the insert key to add the following items.
|
Accelerator ID |
Key |
|
ID_TRANSFER_GETDATA |
VK_F2 |
|
ID_TRANSFER_STOREDATA |
VK_F3 |
|
Table 1 |
|
Be sure to turn off the Ctrl, Alt, and Shift modifiers. The Accelerator edit screen and Accel Properties dialog are shown in the illustration below.

Figure 21: The Accelerator resource edit editor and properties dialog.
Use ClassWizard to add the view class command and update command UI message handlers. Select the CMymfcproView class, and then add the following member functions.
|
Object ID |
Message |
Member Function |
|
ID_TRANSFER_GETDATA |
COMMAND |
OnTransferGetData() |
|
ID_TRANSFER_STOREDATA |
COMMAND |
OnTransferStoreData() |
|
ID_TRANSFER_STOREDATA |
UPDATE_COMMAND_UI |
OnUpdateTransferStoreData() |
|
Table 1 |
||
|
Figure 22: Invoking ClassWizard to add the view class command and update command UI message handlers. |

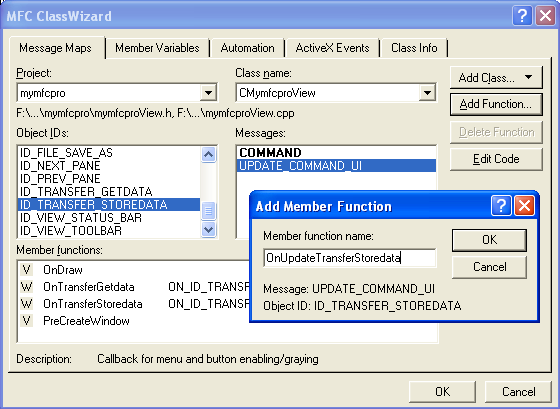
Figure 23: Adding the view class command and update command UI message handlers.
Use ClassWizard to add the document class command and update command UI message handlers. Select the CMymfcproDoc class, and then add the following member functions.
|
Object ID |
Message |
Member Function |
|
ID_EDIT_CLEAR_ALL |
COMMAND |
OnEditClearDocument() |
|
ID_EDIT_CLEAR_ALL |
UPDATE_COMMAND_UI |
OnUpdateEditClearDocument() |
|
Table 1 |
||
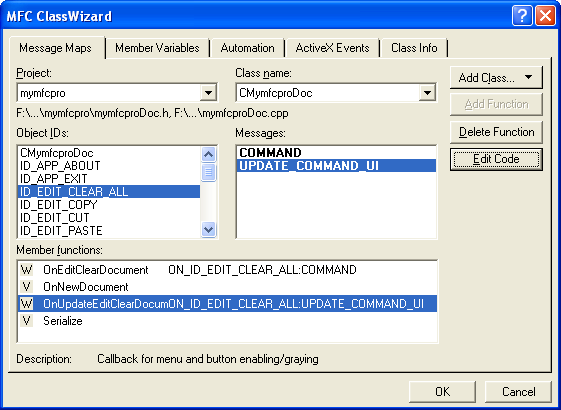
Figure 24: Using ClassWizard to add the document class command and update command UI message handlers.
Add a CString data member to the CMymfcproDoc class. Edit the file MymfcproDoc.h or use ClassView.
public:
CString m_strText;

Figure 25: Using ClassView to add new member variable to CMymfcproDoc class.

Figure 26: Entering the variable type and name.
Edit the document class member functions in MymfcproDoc.cpp. The OnNewDocument() function was generated by ClassWizard. The framework calls this function after it first constructs the document and when the user chooses New from the File menu. Your version sets some text in the string data member. Add the following code:
BOOL CMymfcproDoc::OnNewDocument()
{
if (!CDocument::OnNewDocument())
return FALSE;
m_strText = "Hello...from CMymfcproDoc::OnNewDocument";
return TRUE;
}

Listing 1
The Edit Clear Document message handler sets m_strText to empty, and the update command UI handler grays the menu item if the string is already empty. Remember that the framework calls OnUpdateEditClearDocument() when the Edit menu pops up. Add the following code:
void CMymfcproDoc::OnEditClearDocument()
{
m_strText.Empty();
}
void CMymfcproDoc::OnUpdateEditClearDocument(CCmdUI* pCmdUI)
{
pCmdUI->Enable(!m_strText.IsEmpty());
}

Listing 2.
Add a CRichEditCtrl data member to the CMymfcproView class. Edit the file MymfcproView.h or use ClassView.
public:
CRichEditCtrl m_rich;

Listing 3.
Or using ClassView
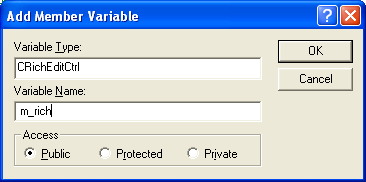
Figure 27: Adding a CRichEditCtrl data member to the CMymfcproView class.
Use ClassWizard to map the WM_CREATE and WM_SIZE messages in the CMymfcproView class. The OnCreate() function creates the rich edit control.
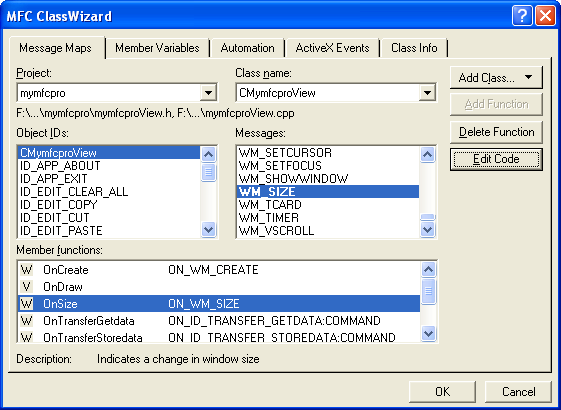
Figure 28: Using ClassWizard to map the WM_CREATE and WM_SIZE messages in the CMymfcproView class.
The control's size is 0 here because the view window doesn't have a size yet. The code for the two handlers is shown below. Click the Edit Code button and add the following codes.
int CMymfcproView::OnCreate(LPCREATESTRUCT lpCreateStruct)
{
CRect rect(0, 0, 0, 0);
if (CView::OnCreate(lpCreateStruct) == -1)
return -1;
m_rich.Create(ES_AUTOVSCROLL | ES_MULTILINE | ES_WANTRETURN |
WS_CHILD | WS_VISIBLE | WS_VSCROLL, rect, this, 1);
return 0;
}

Listing 4.
Windows sends the WM_SIZE message to the view as soon as the view's initial size is determined and again each time the user changes the frame size. This handler simply adjusts the rich edit control's size to fill the view client area. Add the following code:
void CMymfcproView::OnSize(UINT nType, int cx, int cy)
{
CRect rect;
CView::OnSize(nType, cx, cy);
GetClientRect(rect);
m_rich.SetWindowPos(&wndTop, 0, 0, rect.right - rect.left, rect.bottom - rect.top, SWP_SHOWWINDOW);
}

Listing 5.
Edit the menu command handler functions in MymfcproView.cpp. ClassWizard generated these skeleton functions when you mapped the menu commands in the previous step. The OnTransferGetData() function gets the text from the document data member and puts it in the rich edit control. The function then clears the control’s modified flag. There is no update command UI handler. Add the following code:
void CMymfcproView::OnTransferGetData()
{
CmymfcproDoc* pDoc = GetDocument();
m_rich.SetWindowText(pDoc->m_strText);
m_rich.SetModify(FALSE);
}
-------------------------------------------------------------------------------------------------------------------------------------------------------
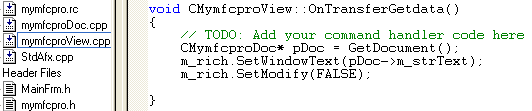
Listing 6.
The OnTransferStoreData() function copies the text from the view’s rich edit control to the document string and resets the control’s modified flag. The corresponding update command UI handler grays the menu item if the control has not been changed since it was last copied to or from the document. Add the following code:
void CmymfcproView::OnTransferStoreData()
{
CmymfcproDoc* pDoc = GetDocument();
m_rich.GetWindowText(pDoc->m_strText);
m_rich.SetModify(FALSE);
}
void CmymfcproView::OnUpdateTransferStoreData(CcmdUI* pCmdUI)
{
pCmdUI->Enable(m_rich.GetModify());
}
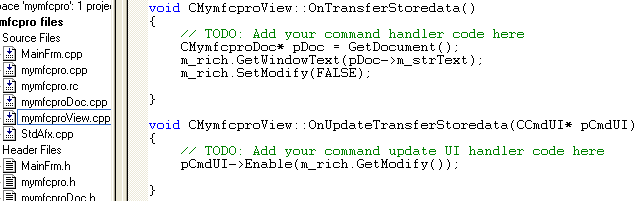
Listing 7.
Build and test the MYMFCPRO application.

Figure 29: Building the MYMFCPRO program.

Figure 30: Executing the MYMFCPRO program.
The following is the program output. When the application starts, the Clear Document item on the Edit menu should be enabled. Choose Get Data From Document from the Transfer menu. Some text should appear. Edit the text, and then choose Store Data In Document. That menu item should now appear gray. Try choosing the Clear Document command, and then choose Get Data From Document again.

Figure 31: Testing MYMFCPRO program, getting the data from the document.
Again, let see the relationship of the Document -View. Just click the Get Data From Document sub menu of the Transfer menu.
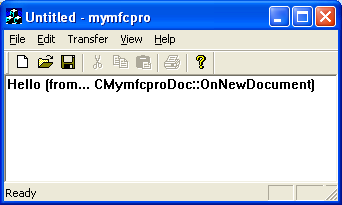
Figure32: The default data from the document.
The program display string from Document (the default, because we do not store any string/data yet). Next, type some text and click the Store Data In Document menu. The data sent to and store in the Document.
Figure 33: Storing some data (text) into the document, doing it through view.
Next, delete the string manually. So the View doesn’t have any displayed data. Remember that the data has been stored in Document.

Figure 34: Deleting the data in view (a copy of the data is in document).
Then Click the Get Data From Document. The previous sample string will be displayed.
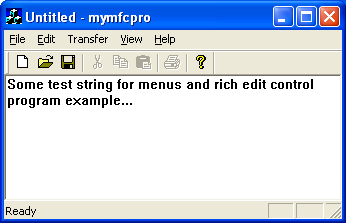
Figure 35: Getting the data from the document through view.
Through the Clear Document sub menu we can delete the stored data in the document. Click the Clear Document sub menu.
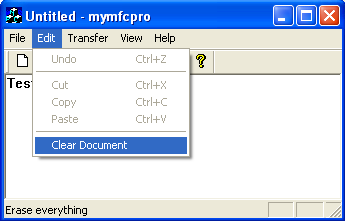
Figure 36: Deleting data stored in the document through view.
Then when we request the previous data from Document, through the Get Data From Document, of course the View displays nothing.

Figure 37: Viewing the data in the document after deleting it, no more data.
Further reading and digging:
-
MSDN MFC 9.0 class library online documentation - latest version.
-
DCOM at MSDN.
-
COM+ at MSDN.
-
COM at MSDN.
-
Unicode and Multi-byte character set: Story and program examples.