| Tenouk C & C++ | MFC Home | Modal Dialog & Windows Common Controls 4 | Modeless Dialog & Windows Common Dialogs 1 | Download | Site Index |
Module 5d:
The Modal Dialog and Windows Common Controls 5
This is a continuation from the previous module... Program examples compiled using Visual C++ 6.0 (MFC 6.0) compiler on Windows XP Pro machine with Service Pack 2. Topics and sub topics for this Tutorial are listed below:
-
The MYMFC8 Example...a continuation...
-
About Icons
-
Other Windows Common Controls
Program the spin button control. The spin control depends on its buddy edit control, located immediately before it in the tab order. Use ClassWizard to add a double-precision data member called m_dSpin for the IDC_BUDDY_SPIN1 edit control.
|
Figure 71: Adding a double-precision m_dSpin for the IDC_BUDDY_SPIN1 edit control. |


Figure 72: The added member variable.
We're using a double instead of an int because the int would require almost no programming, and that would be too easy. We want the edit control range to be 0.0 to 10.0, but the spin control itself needs an integer range. Add the following code to OnInitDialog() to set the spin control range to 0 to 100 and to set its initial value to m_dSpin * 10.0:
CSpinButtonCtrl* pSpin = (CSpinButtonCtrl*) GetDlgItem(IDC_SPIN1);
pSpin->SetRange(0, 100);
pSpin->SetPos((int) (m_dSpin * 10.0));

Listing 27.
To display the current value in the buddy edit control, you need to map the WM_VSCROLL message that the spin control sends to the dialog. Here's the code:
void CMymfc8Dialog::OnVScroll(UINT nSBCode, UINT nPos, CScrollBar* pScrollBar)
{
if (nSBCode == SB_ENDSCROLL)
{
return; // Reject spurious messages
}
// Process scroll messages from IDC_SPIN1 only
if (pScrollBar->GetDlgCtrlID() == IDC_SPIN1)
{
CString strValue;
strValue.Format("%3.1f", (double) nPos / 10.0);
((CSpinButtonCtrl*) pScrollBar)->GetBuddy()->SetWindowText(strValue);
}
}

Listing 28.
There's no need for you to add code in OnOK() or in DoDataExchange() because the dialog data exchange code processes the contents of the edit control. In the dialog editor, select the spin control's Auto Buddy property and the buddy's Read-only property.

Figure 73: Modifying the Spin control properties.
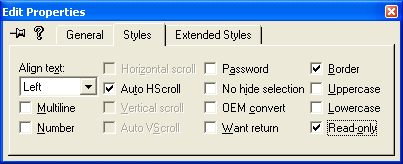
Figure 74: Modifying the Edit control properties.
Set up an image list. Both the list control and the tree control need an image list, and the image list needs icons.
First use the graphics editor to add icons to the project's RC file.

Figure 75: Inserting new icons.

Figure 76: Modifying icon properties in resource editor.

Figure 77: Completed icons creation.
Use fancier icons if you have them. You can import an icon by choosing Resource from the Insert menu and then clicking the Import button. For this example, the icon resource IDs are as follows.
|
Resource ID |
Icon File name |
|
IDI_BLACK |
Icon1 |
|
IDI_BLUE |
Icon3 |
|
IDI_CYAN |
Icon5 |
|
IDI_GREEN |
Icon7 |
|
IDI_PURPLE |
Icon6 |
|
IDI_RED |
Icon2 |
|
IDI_WHITE |
Icon0 |
|
IDI_YELLOW |
Icon4 |
|
Table 3: Icons resource IDs. |
|
Next add a private CImageList data member called m_imageList in the CMymfc8Dialog class header.
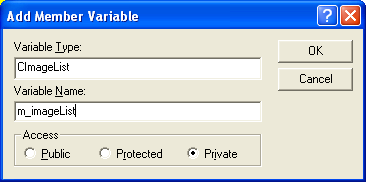
Figure 78: Adding a private CImageList data member, m_imageList in the CMymfc8Dialog class header.

Listing 29.
And then add the following code to OnInitDialog():
HICON hIcon[8];
int n;
m_imageList.Create(16, 16, 0, 8, 8); // 32, 32 for large icons
hIcon[0] = AfxGetApp()->LoadIcon(IDI_WHITE);
hIcon[1] = AfxGetApp()->LoadIcon(IDI_BLACK);
hIcon[2] = AfxGetApp()->LoadIcon(IDI_RED);
hIcon[3] = AfxGetApp()->LoadIcon(IDI_BLUE);
hIcon[4] = AfxGetApp()->LoadIcon(IDI_YELLOW);
hIcon[5] = AfxGetApp()->LoadIcon(IDI_CYAN);
hIcon[6] = AfxGetApp()->LoadIcon(IDI_PURPLE);
hIcon[7] = AfxGetApp()->LoadIcon(IDI_GREEN);
for (n = 0; n < 8; n++)
{
m_imageList.Add(hIcon[n]);
}
------------------------------------------------------------------------------------

Listing 30.
About Icons
You probably know that a bitmap is an array of bits that represent pixels on the display. In Windows, an icon is a "bundle" of bitmaps. First of all, an icon has different bitmaps for different sizes. Typically, small icons are 16-by-16 pixels and large icons are 32-by-32 pixels. Within each size are two separate bitmaps: one 4-bit-per-pixel bitmap for the color image and one monochrome (1-bit-per-pixel) bitmap for the "mask." If a mask bit is 0, the corresponding image pixel represents an opaque color. If the mask bit is 1, an image color of black (0) means that the pixel is transparent and an image color of white (0xF) means that the background color is inverted at the pixel location. Windows 95 and Windows NT seem to process inverted colors a little differently than Windows 3.x does, the inverted pixels show up transparent against the desktop, black against a Windows Explorer window background, and white against list and tree control backgrounds. Don't ask me why.
Small icons were new with Windows 95. They're used in the task bar, in Windows Explorer, and in your list and tree controls, if you want them there. If an icon doesn't have a 16-by-16-pixel bitmap, Windows manufactures a small icon out of the 32-by-32-pixel bitmap, but it won't be as neat as one you draw yourself. The graphics editor lets you create and edit icons. Look at the color palette shown here.

Figure 79: Color palette and other utilities for icon editing.
The top square in the upper-left portion shows you the main color for brushes, shape interiors, and so on, and the square under it shows the border color for shape outlines. You select a main color by left-clicking on a color, and you select a border color by right-clicking on a color. Now look at the top center portion of the color palette. You click on the upper "monitor" to paint transparent pixels, which are drawn in dark cyan. You click on the lower monitor to paint inverted pixels, which are drawn in red.
Program the list control. In the dialog editor, set the list control's style attributes as shown in the next illustration.
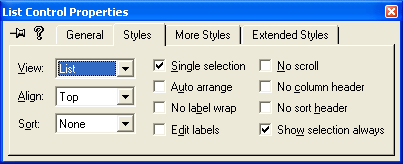
Figure 80: Modifying the list control properties.
Make sure the Border style on the More Styles page is set. Next add the following code to OnInitDialog():
static char* color[ ] = {"white", "black", "red", "blue", "yellow", "cyan", "purple", "green"};
CListCtrl* pList = (CListCtrl*) GetDlgItem(IDC_LISTVIEW1);
pList->SetImageList(&m_imageList, LVSIL_SMALL);
for (n = 0; n < 8; n++)
{
pList->InsertItem(n, color[n], n);
}
pList->SetBkColor(RGB(0, 255, 255)); // UGLY!
pList->SetTextBkColor(RGB(0, 255, 255));

Listing 31.
As the last two lines illustrate, you don't use the WM_CTLCOLOR message with common controls; you just call a function to set the background color. As you'll see when you run the program, however, the icons' inverse-color pixels look shabby. If you use ClassWizard to map the list control's LVN_ITEMCHANGED notification message, so that you'll be able to track the user's selection of items.

Figure 81: Mapping the list control's LVN_ITEMCHANGED notification message.
The code in the following handler displays the selected item's text in a static control:
void CMymfc8Dialog::OnItemchangedListview1(NMHDR* pNMHDR, LRESULT* pResult)
{
NM_LISTVIEW* pNMListView = (NM_LISTVIEW*)pNMHDR;
CListCtrl* pList = (CListCtrl*) GetDlgItem(IDC_LISTVIEW1);
int nSelected = pNMListView->iItem;
if (nSelected >= 0)
{
CString strItem = pList->GetItemText(nSelected, 0);
SetDlgItemText(IDC_STATIC_LISTVIEW1, strItem);
}
*pResult = 0;
}

Listing 32.
The NM_LISTVIEW structure has a data member called iItem that contains the index of the selected item.
Program the tree control. In the dialog editor, set the tree control's style attributes as shown here.

Figure 82: Modifying the tree control styles.

Figure 83: Another modification of the tree control styles.
Next, add the following lines to OnInitDialog():
|
CTreeCtrl* pTree = (CTreeCtrl*) GetDlgItem(IDC_TREEVIEW1); pTree->SetImageList(&m_imageList, TVSIL_NORMAL); // tree structure common values TV_INSERTSTRUCT tvinsert; tvinsert.hParent = NULL; tvinsert.hInsertAfter = TVI_LAST; tvinsert.item.mask = TVIF_IMAGE | TVIF_SELECTEDIMAGE | TVIF_TEXT; tvinsert.item.hItem = NULL; tvinsert.item.state = 0; tvinsert.item.stateMask = 0; tvinsert.item.cchTextMax = 6; tvinsert.item.iSelectedImage = 1; tvinsert.item.cChildren = 0; tvinsert.item.lParam = 0; // top level tvinsert.item.pszText = "Homer"; tvinsert.item.iImage = 2; HTREEITEM hDad = pTree->InsertItem(&tvinsert); tvinsert.item.pszText = "Marge"; HTREEITEM hMom = pTree->InsertItem(&tvinsert); // second level tvinsert.hParent = hDad; tvinsert.item.pszText = "Bart"; tvinsert.item.iImage = 3; pTree->InsertItem(&tvinsert); tvinsert.item.pszText = "Lisa"; pTree->InsertItem(&tvinsert); // second level tvinsert.hParent = hMom; tvinsert.item.pszText = "Bart"; tvinsert.item.iImage = 4; pTree->InsertItem(&tvinsert); tvinsert.item.pszText = "Lisa"; pTree->InsertItem(&tvinsert); tvinsert.item.pszText = "Dilbert"; HTREEITEM hOther = pTree->InsertItem(&tvinsert); // third level tvinsert.hParent = hOther; tvinsert.item.pszText = "Dogbert"; tvinsert.item.iImage = 7; pTree->InsertItem(&tvinsert); tvinsert.item.pszText = "Ratbert"; pTree->InsertItem(&tvinsert); |

Listing 33.
As you can see, this code sets TV_INSERTSTRUCT text and image indexes and calls InsertItem() to add nodes to the tree. Finally, use ClassWizard to map the TVN_SELCHANGED notification for the tree control.

Figure 84: Mapping the TVN_SELCHANGED notification for the tree control.
Click the Edit Code button and add the handler code to display the selected text in a static control:
void CMymfc8Dialog::OnSelchangedTreeview1(NMHDR* pNMHDR, LRESULT* pResult)
{
NM_TREEVIEW* pNMTreeView = (NM_TREEVIEW*)pNMHDR;
CTreeCtrl* pTree = (CTreeCtrl*) GetDlgItem(IDC_TREEVIEW1);
HTREEITEM hSelected = pNMTreeView->itemNew.hItem;
if (hSelected != NULL)
{
char text[31];
TV_ITEM item;
item.mask = TVIF_HANDLE | TVIF_TEXT;
item.hItem = hSelected;
item.pszText = text;
item.cchTextMax = 30;
VERIFY(pTree->GetItem(&item));
SetDlgItemText(IDC_STATIC_TREEVIEW1, text);
}
*pResult = 0;
}

Listing 34.
The NM_TREEVIEW structure has a data member called itemNew that contains information about the selected node; itemNew.hItem is the handle of that node. The GetItem() function retrieves the node's data, storing the text using a pointer supplied in the TV_ITEM structure. The mask variable tells Windows that the hItem handle is valid going in and that text output is desired.
Add code to the virtual OnDraw() function in file mymfc8View.cpp. The following code replaces the previous code:
void CMymfc8View::OnDraw(CDC* pDC)
{
pDC->TextOut(30, 30, "Press the left mouse button here.");
}

Listing 35.
Use ClassWizard to add the OnLButtonDown() member function.
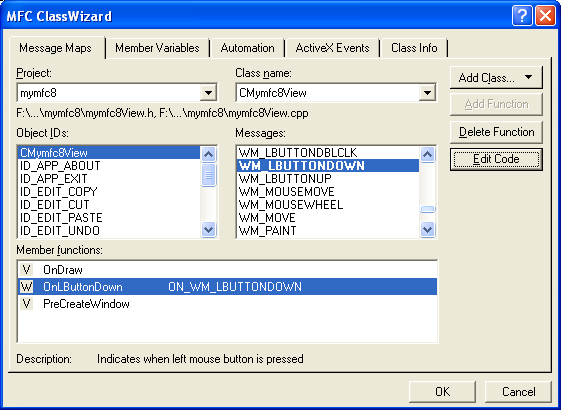
Figure 85: Adding the OnLButtonDown() member function to handle the left mouse click event.
Edit the AppWizard-generated code as follows:
void CMymfc8View::OnLButtonDown(UINT nFlags, CPoint point)
{
CMymfc8Dialog dlg;
dlg.m_nTrackbar1 = 20;
dlg.m_nTrackbar2 = 2; // index for 8.0
dlg.m_nProgress = 70; // write-only
dlg.m_dSpin = 3.2;
dlg.DoModal();
}
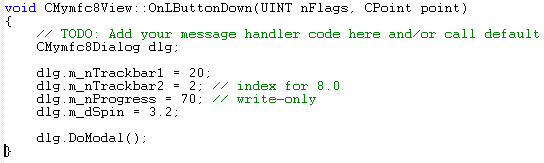
Listing 36.
Add a statement to include mymfc8Dialog.h in file mymfc8View.cpp.

If you unintentionally deleted the return value of the very long code for CMymfc8Dialog::OnInitDialog, make sure it is like the following code.
return CDialog::OnInitDialog();

Listing 37.
Finally, build and run the program. Experiment with the controls to see how they work. We haven't added code to make the progress indicator functional that will be covered in Module 22.

Figure 86: The MYMFC8 program output.

Figure 87: MYMFC8 program output when the left mouse button is clicked, dialog with full of the common controls.
Other Windows Common Controls
You've seen most of the common controls that appear on the dialog editor control palette. We've skipped the animation control because this book doesn't cover multimedia, and we've skipped the hot key control because it isn't very interesting. The tab control is interesting, but you seldom use it inside another dialog. Module 7 shows you how to construct a tabbed dialog, sometimes known as a property sheet. In Module 7, you'll also see an application that is built around the CRichEditView class, which incorporates the Windows rich edit control.
Further reading and digging:
-
DCOM at MSDN.
-
COM+ at MSDN.
-
COM at MSDN.
-
Unicode and Multi-byte character set: Story and program examples.