| Tenouk C & C++ | MFC Home | Bitmaps 1 | Bitmaps 3 | Download | Site Index |
Module 21a: The Bitmaps 2
This is a continuation from the previous module... Program examples compiled using Visual C++ 6.0 (MFC 6.0) compiler on Windows XP Pro machine with Service Pack 2. Topics and sub topics for this Tutorial are listed below:
-
The MYMFC26B Example
|
The MYMFC26B Example
In the MYMFC6 example in Module 4, the user dragged a circle with the mouse. As the circle moved, the display flickered because the circle was erased and redrawn on every mouse-move message. MYMFC26B uses a GDI bitmap to correct this problem. The MYMFC6 custom code for mouse message processing carries over almost intact; most of the new code is in the OnPaint() and OnInitialUpdate() functions. In summary, the MYMFC26B OnInitialUpdate() function creates a memory device context and a bitmap that are compatible with the display. The OnPaint() function prepares the memory device context for drawing, passes OnDraw() a handle to the memory device context, and copies the resulting bitmap from the memory device context to the display.
Here are the steps to build MYMFC26B from scratch:
Run AppWizard to produce \mfcproject\mymfc26B. Accept all the default settings but two: select Single Document and select CScrollView view as the base class for CMymfc26BView in step 6. The options and the default class names are shown here.
Figure 10: MYMFC26B step 6 of 6 AppWizard using CScrollView as a view based class. |


Figure 11: MYMFC26B project summary.
Use ClassWizard to add CMymfc26BView message handlers. Add message handlers for the following messages:
-
WM_LBUTTONDOWN
-
WM_LBUTTONUP
-
WM_MOUSEMOVE
-
WM_PAINT
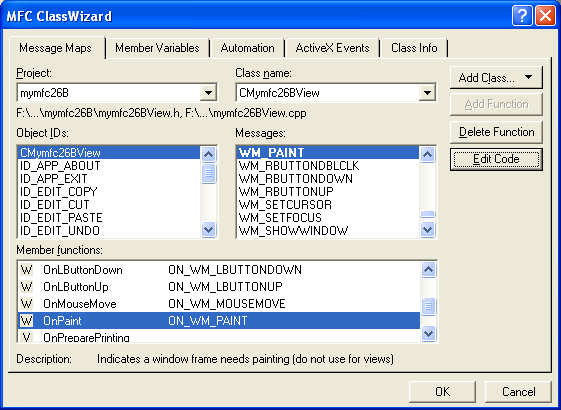
Figure 12: Using ClassWizard to add CMymfc26BView message handlers.
Edit the mymfc26BView.h header file. Add the private data members shown here to the CMymfc26BView class:
private:
const CSize m_sizeEllipse;
CPoint m_pointTopLeft;
BOOL m_bCaptured;
CSize m_sizeOffset;
CDC* m_pdcMemory;
CBitmap* m_pBitmap;

Figure 13: Adding private data members to the CMymfc26BView class.

Listing 6.
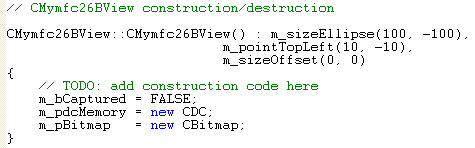
Code the CMymfc26BView constructor and destructor in mymfc26BView.cpp. You need a memory device context object and a bitmap GDI object. These are constructed in the view's constructor and destroyed in the view's destructor. Add the following code:
CMymfc26BView::CMymfc26BView() : m_sizeEllipse(100, -100),
m_pointTopLeft(10, -10),
m_sizeOffset(0, 0)
{
m_bCaptured = FALSE;
m_pdcMemory = new CDC;
m_pBitmap = new CBitmap;
}
Listing 7.
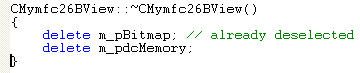
CMymfc26BView::~CMymfc26BView()
{
delete m_pBitmap; // already deselected
delete m_pdcMemory;
}
Listing 8.
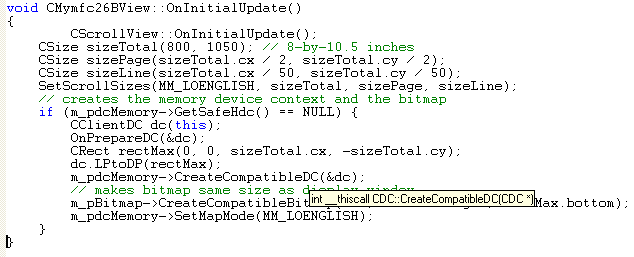
Add code for the OnInitialUpdate() function in mymfc26BView.cpp. The C++ memory device context and bitmap objects are already constructed. This function creates the corresponding Windows objects. Both the device context and the bitmap are compatible with the display context dc, but you must explicitly set the memory device context's mapping mode to match the display context. You could create the bitmap in the OnPaint() function, but the program runs faster if you create it once here. Add the code shown here:
void CMymfc26BView::OnInitialUpdate()
{
CScrollView::OnInitialUpdate();
CSize sizeTotal(800, 1050); // 8-by-10.5 inches
CSize sizePage(sizeTotal.cx / 2, sizeTotal.cy / 2);
CSize sizeLine(sizeTotal.cx / 50, sizeTotal.cy / 50);
SetScrollSizes(MM_LOENGLISH, sizeTotal, sizePage, sizeLine);
// creates the memory device context and the bitmap
if (m_pdcMemory->GetSafeHdc() == NULL) {
CClientDC dc(this);
OnPrepareDC(&dc);
CRect rectMax(0, 0, sizeTotal.cx, -sizeTotal.cy);
dc.LPtoDP(rectMax);
m_pdcMemory->CreateCompatibleDC(&dc);
// makes bitmap same size as display window
m_pBitmap->CreateCompatibleBitmap(&dc, rectMax.right, rectMax.bottom);
m_pdcMemory->SetMapMode(MM_LOENGLISH);
}
}
Listing 9.
Add code for the OnPaint() function in mymfc26BView.cpp. Normally it isn't necessary to map the WM_PAINT message in your derived view class. The CView version of OnPaint() contains the following code:
CPaintDC dc(this);
OnPrepareDC(&dc);
OnDraw(&dc);
In this example, you will be using the OnPaint() function to reduce screen flicker through the use of a memory device context. OnDraw() is passed this memory device context for the display, and it is passed the printer device context for printing. Thus, OnDraw() can perform tasks common to the display and to the printer. You don't need to use the bitmap with the printer because the printer has no speed constraint. The OnPaint() function must perform, in order, the following three steps to prepare the memory device context for drawing:
-
Select the bitmap into the memory device context.
-
Transfer the invalid rectangle (as calculated by OnMouseMove()) from the display context to the memory device context. There is no SetClipRect() function, but the CDC::IntersectClipRect function, when called after the CDC::SelectClipRgn function (with a NULL parameter), has the same effect. If you don't set the clipping rectangle to the minimum size, the program runs more slowly.
-
Initialize the bitmap to the current window background color. The CDC::PatBlt function fills the specified rectangle with a pattern. In this case, the pattern is the brush pattern for the current window background. That brush must first be constructed and selected into the memory device context.
After the memory device context is prepared, OnPaint() can call OnDraw() with a memory device context parameter. Then the CDC::BitBlt function copies the updated rectangle from the memory device context to the display device context. Add the following code:
void CMymfc26BView::OnPaint()
{
CPaintDC dc(this); // device context for painting
OnPrepareDC(&dc);
CRect rectUpdate;
dc.GetClipBox(&rectUpdate);
CBitmap* pOldBitmap = m_pdcMemory->SelectObject(m_pBitmap);
m_pdcMemory->SelectClipRgn(NULL);
m_pdcMemory->IntersectClipRect(&rectUpdate);
CBrush backgroundBrush((COLORREF) ::GetSysColor(COLOR_WINDOW));
CBrush* pOldBrush = m_pdcMemory->SelectObject(&backgroundBrush);
m_pdcMemory->PatBlt(rectUpdate.left, rectUpdate.top, rectUpdate.Width(), rectUpdate.Height(), PATCOPY);
OnDraw(m_pdcMemory);
dc.BitBlt(rectUpdate.left, rectUpdate.top, rectUpdate.Width(), rectUpdate.Height(), m_pdcMemory, rectUpdate.left, rectUpdate.top, SRCCOPY);
m_pdcMemory->SelectObject(pOldBitmap);
m_pdcMemory->SelectObject(pOldBrush);
}

Listing 10.
Code the OnDraw() function in mymfc26BView.cpp. Copy the code from mymfc6View.cpp as shown below. In MYMFC26B, OnDraw() is passed a pointer to a memory device context by the OnPaint() function. For printing, OnDraw() is passed a pointer to the printer device context.
void CMymfc26BView::OnDraw(CDC* pDC)
{
// TODO: add draw code for native data here
CBrush brushHatch(HS_DIAGCROSS, RGB(255, 0, 0));
CPoint point(0, 0); // logical (0, 0)
pDC->LPtoDP(&point); // In device coordinates,
pDC->SetBrushOrg(point); // align the brush with
// the window origin
pDC->SelectObject(&brushHatch);
pDC->Ellipse(CRect(m_pointTopLeft, m_sizeEllipse));
pDC->SelectStockObject(BLACK_BRUSH); // Deselect brushHatch
pDC->Rectangle(CRect(100, -100, 200, -200)); // Test invalid rect
}
-----------------------------------------------------------------------------------------------------------------------------------------------------

Listing 11.
Copy the mouse message-handling code from mymfc6View.cpp. Copy the functions shown below from mymfc6View.cpp to mymfc26BView.cpp. Be sure to change the functions' class names from CMymfc6View to CMymfc26BView.
-
OnLButtonDown()
-
OnLButtonUp()
-
OnMouseMove()
void CMymfc26BView::OnLButtonDown(UINT nFlags, CPoint point)
{
// TODO: Add your message handler code here and/or call default
CRect rectEllipse(m_pointTopLeft, m_sizeEllipse); // still logical
CRgn circle;
CClientDC dc(this);
OnPrepareDC(&dc);
dc.LPtoDP(rectEllipse); // Now it's in device coordinates
circle.CreateEllipticRgnIndirect(rectEllipse);
if (circle.PtInRegion(point)) {
// Capturing the mouse ensures subsequent LButtonUp message
SetCapture();
m_bCaptured = TRUE;
CPoint pointTopLeft(m_pointTopLeft);
dc.LPtoDP(&pointTopLeft);
m_sizeOffset = point - pointTopLeft; // device coordinates
// New mouse cursor is active while mouse is captured
::SetCursor(::LoadCursor(NULL, IDC_CROSS));
}
}

Listing 12.
void CMymfc26BView::OnLButtonUp(UINT nFlags, CPoint point)
{
// TODO: Add your message handler code here and/or call default
if (m_bCaptured)
{
::ReleaseCapture();
m_bCaptured = FALSE;
}
}

Listing 13.
void CMymfc26BView::OnMouseMove(UINT nFlags, CPoint point)
{
// TODO: Add your message handler code here and/or call default
if (m_bCaptured)
{
CClientDC dc(this);
OnPrepareDC(&dc);
CRect rectOld(m_pointTopLeft, m_sizeEllipse);
dc.LPtoDP(rectOld);
InvalidateRect(rectOld, TRUE);
m_pointTopLeft = point - m_sizeOffset;
dc.DPtoLP(&m_pointTopLeft);
CRect rectNew(m_pointTopLeft, m_sizeEllipse);
dc.LPtoDP(rectNew);
InvalidateRect(rectNew, TRUE);
}
}

Listing 14.
Change two lines in the OnMouseMove() function in mymfc26BView.cpp. Change the following two lines:
InvalidateRect(rectOld, TRUE);
...
InvalidateRect(rectNew, TRUE);
to
InvalidateRect(rectOld, FALSE);
...
InvalidateRect(rectNew, FALSE);
If the second CWnd::InvalidateRect parameter is TRUE (the default), Windows erases the background before repainting the invalid rectangle. That's what you needed in MYMFC6, but the background erasure is what causes the flicker. Because the entire invalid rectangle is being copied from the bitmap, you no longer need to erase the background. The FALSE parameter prevents this erasure.
Build and run the application. Here is the MYMFC26B program output.

Figure 14: MYMFC26A program output, with smooth movement of the circle bitmap.
Is the circle's movement smoother now? The problem is that the bitmap is only 8-by-10.5 inches, and if the scrolling window is big enough, the circle goes off the edge. One solution to this problem is to make the bitmap as big as the largest display.
Continue on next module...part 3.
Further reading and digging:
-
MSDN What's New (MFC Feature Pack) - feature pack.
-
DCOM at MSDN.
-
COM+ at MSDN.
-
COM at MSDN.
-
Unicode and Multi-byte character set: Story and program examples.