| Tenouk C & C++ | MFC Home | Modal Dialog & Windows Common Controls 2 | Modal Dialog & Windows Common Controls 4 | Download | Site Index |
Module 5b:
The Modal Dialog and Windows Common Controls 3
This is a continuation from the previous module... Program examples compiled using Visual C++ 6.0 (MFC 6.0) compiler on Windows XP Pro machine with Service Pack 2. Topics and sub topics for this Tutorial are listed below:
-
Taking Control of the OnOK() Exit
-
For Win32 Programmers
-
OnCancel() Processing
-
Hooking Up the Scroll Bar Controls
-
Identifying Controls: CWnd Pointers and Control IDs
-
Setting the Color for the Dialog Background and for Controls
-
For Win32 Programmers
-
Painting Inside the Dialog Window
-
Adding Dialog Controls at Runtime
-
Using Other Control Features
-
For Win32 Programmers
-
Windows Common Controls
-
The Progress Indicator Control
-
The Trackbar Control
-
The Spin Button Control
-
The List Control
-
The Tree Control
-
The WM_NOTIFY Message
|
|
Taking Control of the OnOK() Exit
In the original MYMFC7 program, the CDialog::OnOK virtual function handled the OK button, which triggered data exchange and the exit from the dialog. Pressing the Enter key happens to have the same effect, and that might or might not be what you want. If the user presses Enter while in the Name edit control, for example, the dialog closes immediately. What's going on here? When the user presses Enter, Windows looks to see which pushbutton has the input focus, as indicated on the screen by a dotted rectangle. If no button has the focus, Windows looks for the default pushbutton that the program or the resource specifies. The default pushbutton has a thicker border. If the dialog has no default button, the virtual OnOK() function is called, even if the dialog does not contain an OK button. You can disable the Enter key by writing a do-nothing CMymfc7Dialog::OnOK function and adding the exit code to a new function that responds to clicking the OK button. Here are the steps:
Figure 47: Mapping the IDOK button to the virtual OnOK() function.
|

-
Use the dialog editor to change the OK button ID. Select the OK button, change its ID from IDOK to IDC_OK, and then uncheck its Default Button property. Leave the OnOK() function alone.

Figure 48: Changing the OK push button ID.

Figure 49: Modifying the OK push button properties.
-
Use ClassWizard to create a member function called OnClickedOk(). This CMymfc7Dialog class member function is keyed to the BN_CLICKED message from the newly renamed control IDC_OK.

Figure 50: Creating an OnClickedOk() member function and maps it to IDC_OK ID.
-
Edit the body of the OnClickedOk() function in mymfc7Dialog.cpp. This function calls the base class OnOK() function, as did the original CMymfc7Dialog::OnOK function. Here is the code:
void CMymfc7Dialog::OnClickedOk()
{
TRACE("CMymfc7Dialog::OnClickedOk\n");
CDialog::OnOK();
}

Listing 7.
Edit the original OnOK() function in mymfc7Dialog.cpp. This function is a "leftover" handler for the old IDOK button. Edit the code as shown here:
void CMymfc7Dialog::OnOK()
{
// dummy OnOK function -- do NOT call CDialog::OnOK()
TRACE("CMymfc7Dialog::OnOK\n");
}

Listing 8.
Build and test the application. Try pressing the Enter key now. Nothing should happen, but TRACE output should appear in the Debug window. Clicking the OK button should exit the dialog as before, however.
...
Loaded 'C:\WINDOWS\system32\mslbui.dll', no matching symbolic information found.
Warning: skipping non-radio button in group.
CMymfc7Dialog::OnClickedOk
Warning: skipping non-radio button in group.
DoModal return = 1
name = Porter, Harry, ssn = 12345678, cat = 1
dept = Documentation, skill = Executive, lang = 1, educ = High School
life = 0, dis = 1, med = 1, bio = Like to do programming for fun
loyalty = 0, reliability = 0
The thread 0xF64 has exited with code 0 (0x0).
The program 'F:\mfcproject\mymfc7\Debug\mymfc7.exe' has exited with code 0 (0x0).
For Win32 Programmers
Dialog controls send WM_ COMMAND notification messages to their parent dialogs. For a single button click, for example, the bottom 16 bits of wParam contain the button ID, the top 16 bits of wParam contain the BN_CLICKED notification code, and lParam contains the button handle. Most window procedure functions process these notification messages with a nested switch statement. MFC "flattens out" the message processing logic by "promoting" control notification messages to the same level as other Windows messages. For a Delete button (for example), ClassWizard generates notification message map entries similar to these:
ON_BN_CLICKED(IDC_DELETE, OnDeleteClicked)
ON_BN_DOUBLECLICKED(IDC_DELETE, OnDeleteDblClicked)
Button events are special because they generate command messages if your dialog class doesn't have notification handlers like the ones above. As Module 13 explains, the application framework "routes" these command messages to various objects in your application. You could also map the control notifications with a more generic ON_ COMMAND message-handling entry like this:
ON_COMMAND(IDC_DELETE, OnDelete)
In this case, the OnDelete() function is unable to distinguish between a single click and a double click, but that's no problem because few Windows-based programs utilize double clicks for buttons.
OnCancel() Processing
Just as pressing the Enter key triggers a call to OnOK(), pressing the Esc key triggers a call to OnCancel(), which results in an exit from the dialog with a DoModal() return code of IDCANCEL. MYMFC7 does no special processing for IDCANCEL; therefore, pressing the Esc key (or clicking the Close button) closes the dialog. You can circumvent this process by substituting a dummy OnCancel() function, following approximately the same procedure you used for the OK button.
Hooking Up the Scroll Bar Controls
The dialog editor allows you to include scroll bar controls in your dialog, and ClassWizard lets you add integer data members. You must add code to make the Loyalty and Reliability scroll bars work. Scroll bar controls have position and range values that can be read and written. If you set the range to (0, 100), for example, a corresponding data member with a value of 50 positions the scroll box at the center of the bar. The function CScrollBar::SetScrollPos also sets the scroll box position. The scroll bars send the WM_HSCROLL and WM_VSCROLL messages to the dialog when the user drags the scroll box or clicks the arrows. The dialog's message handlers must decode these messages and position the scroll box accordingly.
Each control you've seen so far has had its own individual message handler function. Scroll bar controls are different because all horizontal scroll bars in a dialog are tied to a single WM_HSCROLL message handler and all vertical scroll bars are tied to a single WM_VSCROLL handler. Because this monster dialog contains two horizontal scroll bars, the single WM_HSCROLL message handler must figure out which scroll bar sent the scroll message. Here are the steps for adding the scroll bar logic to MYMFC7:
Add the class enum statements for the minimum and maximum scroll range. In mymfc7Dialog.h, add the following lines at the top of the class declaration:
enum { nMin = 0 };
enum { nMax = 100 };

Listing 9.
Edit the OnInitDialog() function to initialize the scroll ranges. In the OnInitDialog() function, we'll set the minimum and the maximum scroll values such that the CMymfc7Dialog data members represent percentage values. A value of 100 means "Set the scroll box to the extreme right"; a value of 0 means "Set the scroll box to the extreme left." Add the following code to the CMymfc7Dialog member function OnInitDialog() in the file mymfc7Dialog.cpp:
CScrollBar* pSB = (CScrollBar*) GetDlgItem(IDC_LOYAL);
pSB->SetScrollRange(nMin, nMax);
pSB = (CScrollBar*) GetDlgItem(IDC_RELY);
pSB->SetScrollRange(nMin, nMax);

Listing 10.
Use ClassWizard to add a scroll bar message handler to CMymfc7Dialog. Choose the WM_HSCROLL message, and then add the member function OnHScroll().

Figure 51: Adding a scroll bar message handler to CMymfc7Dialog.
Click the Edit Code button and enter the following code:
void CMymfc7Dialog::OnHScroll(UINT nSBCode, UINT nPos, CScrollBar* pScrollBar)
{
int nTemp1, nTemp2;
nTemp1 = pScrollBar->GetScrollPos();
switch(nSBCode) {
case SB_THUMBPOSITION:
pScrollBar->SetScrollPos(nPos);
break;
case SB_LINELEFT: // left arrow button
nTemp2 = (nMax - nMin) / 10;
if ((nTemp1 - nTemp2) > nMin) {
nTemp1 -= nTemp2;
}
else {
nTemp1 = nMin;
}
pScrollBar->SetScrollPos(nTemp1);
break;
case SB_LINERIGHT: // right arrow button
nTemp2 = (nMax - nMin) / 10;
if ((nTemp1 + nTemp2) < nMax) {
nTemp1 += nTemp2;
}
else {
nTemp1 = nMax;
}
pScrollBar->SetScrollPos(nTemp1);
break;
}
}
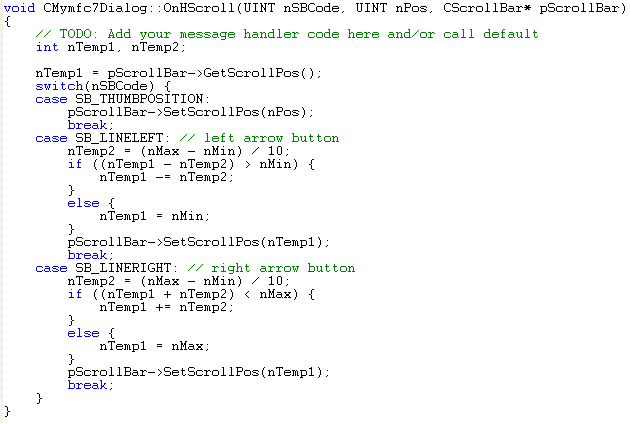
Listing 11.
The scroll bar functions use 16-bit integers for both range and position.
Build and test the application. Build and run MYMFC7 again. Do the scroll bars work this time? The scroll boxes should "stick" after you drag them with the mouse, and they should move when you click the scroll bars' arrows. Notice that we haven't added logic to cover the user's click on the scroll bar itself.

Figure 52: New MYMFC7 program output activating the scroll bars.
Identifying Controls: CWnd Pointers and Control IDs
When you lay out a dialog resource in the dialog editor, you identify each control by an ID such as IDC_SSN. In your program code, however, you often need access to a control's underlying window object. The MFC library provides the CWnd::GetDlgItem function for converting an ID to a CWnd pointer. You've seen this already in the OnInitDialog() member function of class CMymfc7Dialog. The application framework "manufactured" this returned CWnd pointer because there never was a constructor call for the control objects. This pointer is temporary and should not be stored for later use. If you need to convert a CWnd pointer to a control ID, use the MFC library GetDlgCtrlID() member function of class CWnd.
Setting the Color for the Dialog Background and for Controls
You can change the background color of individual dialogs or specific controls in a dialog, but you have to do some extra work. The parent dialog is sent a WM_CTLCOLOR message for each control immediately before the control is displayed. A WM_CTLCOLOR message is also sent on behalf of the dialog itself. If you map this message in your derived dialog class, you can set the foreground and background text colors and select a brush for the control or dialog non-text area. The following is a sample OnCtlColor() function that sets all edit control text color to red and the dialog background to yellow. The m_hYellowBrush and m_hRedBrush variables are data members of type HBRUSH, should be initialized in the dialog's OnInitDialog() function. The nCtlColor parameter indicates the type of control, and the pWnd parameter identifies the specific control. If you wanted to set the color for an individual edit control, you would convert pWnd to a child window ID and test it.
HBRUSH CMyDialog::OnCtlColor(CDC* pDC, CWnd* pWnd, UINT nCtlColor)
{
if (nCtlColor == CTLCOLOR_EDIT) {
pDC->SetBkColor(RGB(255, 255, 0)); // yellow
return m_hYellowBrush;
}
if (nCtlColor == CTLCOLOR_DLG) {
pDC->SetBkColor(RGB(255, 0, 0)); // red
return m_hRedBrush;
}
return CDialog::OnCtlColor(pDC, pWnd, nCtlColor);
}
The dialog does not post the WM_CTLCOLOR message in the message queue; instead, it calls the Win32 SendMessage() function to send the message immediately. Thus the message handler can return a parameter, in this case a handle to a brush. This is not an MFC CBrush object but rather a Win32 HBRUSH. You can create the brush by calling the Win32 functions CreateSolidBrush(), CreateHatchBrush(), and so forth.
For Win32 Programmers
Actually, Win32 no longer has a WM_CTLCOLOR message. It was replaced by control-specific messages such as WM_CTLCOLORBTN, WM_CTLCOLORDLG, and so on. MFC and ClassWizard process these messages invisibly, so your programs look as though they're mapping the old 16-bit WM_CTLCOLOR messages. This trick makes debugging more complex, but it makes portable code easier to write. Another option would be to use the ON_MESSAGE macro to map the real Win32 messages. If your dialog class (or other MFC window class) doesn't map the WM_CTLCOLOR message, the framework reflects the message back to the control.
Let try this one. Add two public data member, m_hYellowBrush and m_hRedBrush of type HBRUSH.

Figure 53: Adding two public data member, m_hYellowBrush and m_hRedBrush of type HBRUSH.

Figure 54: Adding dialog's member variable.

Listing 12.
Then do the message map for the WM_CTRLCOLOR and click the Edit Code button.

Figure 55: The message map of the WM_CTRLCOLOR for CMymfc7Dialog.
Enter the following code.
HBRUSH CMymfc7Dialog::OnCtlColor(CDC* pDC, CWnd* pWnd, UINT nCtlColor)
{
// You can try other controls...
// CTLCOLOR_BTN - Button control
// CTLCOLOR_DLG - Dialog box
// CTLCOLOR_EDIT - Edit control
// CTLCOLOR_LISTBOX - List-box control
// CTLCOLOR_MSGBOX - Message box
// CTLCOLOR_SCROLLBAR - Scroll-bar control
// CTLCOLOR_STATIC - Static control
if (nCtlColor == CTLCOLOR_EDIT) {
pDC->SetBkColor(RGB(255, 255, 0)); // yellow edit control background
pDC->SetTextColor(RGB(255, 0, 0)); // red edit control text
return m_hYellowBrush;
}
if (nCtlColor == CTLCOLOR_BTN) {
pDC->SetBkColor(RGB(255, 0, 0)); // red for dialog
return m_hRedBrush;
}
return CDialog::OnCtlColor(pDC, pWnd, nCtlColor);
}
Build the program.

Figure 56: New MYMFC7 program output with all edit control text color set to red and the background set to yellow.
|
Painting Inside the Dialog Window
You can paint directly in the client area of the dialog window, but you'll avoid overwriting dialog elements if you paint only inside a control window. If you want to display text only, use the dialog editor to create a blank static control with a unique ID and then call the CWnd::SetDlgItemText function in a dialog member function such as OnInitDialog() to place text in the control. Displaying graphics is more complicated. You must use ClassWizard to add an OnPaint() member function to the dialog; this function must convert the static control's ID to a CWnd pointer and get its device context. The trick is to draw inside the control window while preventing Windows from overwriting your work later. The Invalidate()/UpdateWindow() sequence achieves this. Here is an OnPaint() function that paints a small black square in a static control:
void CMyDialog::OnPaint() { CWnd* pWnd = GetDlgItem(IDC_STATIC1); // IDC_STATIC1 specified in the dialog editor CDC* pControlDC = pWnd->GetDC();
pWnd->Invalidate(); pWnd->UpdateWindow(); pControlDC->SelectStockObject(BLACK_BRUSH); pControlDC->Rectangle(0, 0, 10, 10); // black square bullet pWnd->ReleaseDC(pControlDC); } |
As with all windows, the dialog's OnPaint() function is called only if some part of the dialog is invalidated. You can force the OnPaint() call from another dialog member function with the following statement:
Invalidate();
Adding Dialog Controls at Runtime
You've seen how to use the resource editor to create dialog controls at build time. If you need to add a dialog control at runtime, here are the programming steps:
-
Add an embedded control window data member to your dialog class. The MFC control window classes include CButton, CEdit, CListBox, and CComboBox. An embedded control C++ object is constructed and destroyed along with the dialog object.
-
Choose Resource Symbols from Visual C++'s View menu. Add an ID constant for the new control.
-
Use ClassWizard to map the WM_INITDIALOG message, thus overriding CDialog::OnInitDialog. This function should call the embedded control window's Create() member function. This call displays the new control in the dialog. Windows will destroy the control window when it destroys the dialog window.
-
In your derived dialog class, manually add the necessary notification message handlers for your new control.
We will learn this more detail in another Module.
Using Other Control Features
You've seen how to customize the control class CScrollBar by adding code in the dialog's OnInitDialog() member function. You can program other controls in a similar fashion. In the Microsoft Visual C++ MFC Library Reference, or in the online help under "Microsoft Foundation Class Library and Templates," look at the control classes, particularly CListBox and CComboBox. Each has a number of features that ClassWizard does not directly support. Some combo boxes, for example, can support multiple selections. If you want to use these features, don't try to use ClassWizard to add data members. Instead, define your own data members and add your own exchange code in OnInitDialog() and OnClickedOK().
For Win32 Programmers
If you've programmed controls in Win32, you'll know that parent windows communicate to controls via Windows messages. So what does a function such as CListBox::InsertString do? (You've seen this function called in your OnInitDialog() function.) If you look at the MFC source code, you'll see that InsertString() sends an LB_INSERTSTRING message to the designated list-box control. Other control class member functions don't send messages because they apply to all window types. The CScrollView::SetScrollRange function, for example, calls the Win32 SetScrollRange() function, specifying the correct hWnd as a parameter.
Windows Common Controls
The controls you used in MYMFC7 are great learning controls because they're easy to program. Now you're ready for some more "interesting" controls. We'll take a look at some important new Windows controls, introduced for Microsoft Windows 95 and available in Microsoft Windows NT. These include the progress indicator, trackbar, spin button control, list control, and tree control.
The code for these controls is in the Windows COMCTL32.DLL file. This code includes the window procedure for each control, together with code that registers a window class for each control. The registration code is called when the DLL is loaded. When your program initializes a dialog, it uses the symbolic class name in the dialog resource to connect to the window procedure in the DLL. Thus your program owns the control's window, but the code is in the DLL. Except for ActiveX controls, most controls work this way. Example MYMFC8 uses the aforementioned controls. Figure 57 shows the dialog from that example. Refer to it when you read the control descriptions that follow.
Be aware that ClassWizard offers no member variable support for the common controls. You'll have to add code to your OnInitDialog() and OnOK() functions to initialize and read control data. ClassWizard will, however, allow you to map notification messages from common controls.

Figure 57: The Windows Common Controls Dialog example.
The Progress Indicator Control
The progress indicator is the easiest common control to program and is represented by the MFC CProgressCtrl class. It is generally used only for output. This control, together with the trackbar, can effectively replace the scroll bar controls you saw in the previous example. To initialize the progress indicator, call the SetRange() and SetPos() member functions in your OnInitDialog() function, and then call SetPos() anytime in your message handlers. The progress indicator shown in Figure 6-2 has a range of 0 to 100, which is the default range.
The Trackbar Control
The trackbar control (class CSliderCtrl), sometimes called a slider, allows the user to set an "analog" value. Trackbars would have been more effective than sliders for Loyalty and Reliability in the MYMFC7 example. If you specify a large range for this control, 0 to 100 or more, for example, the trackbar's motion appears continuous. If you specify a small range, such as 0 to 5, the tracker moves in discrete increments. You can program tick marks to match the increments. In this discrete mode, you can use a trackbar to set such items as the display screen resolution, lens f-stop values, and so forth. The trackbar does not have a default range.
The trackbar is easier to program than the scroll bar because you don't have to map the WM_HSCROLL or WM_VSCROLL messages in the dialog class. As long as you set the range, the tracker moves when the user slides it or clicks in the body of the trackbar. You might choose to map the scroll messages anyway if you want to show the position value in another control. The GetPos() member function returns the current position value. The top trackbar in Figure 6-2 operates continuously in the range 0 to 100. The bottom trackbar has a range of 0 to 4, and those indexes are mapped to a series of double-precision values (4.0, 5.6, 8.0, 11.0, and 16.0).
The Spin Button Control
The spin button control (class CSpinButtonCtrl) is an itsy-bitsy scroll bar that's most often used in conjunction with an edit control. The edit control, located just ahead of the spin control in the dialog's tabbing order, is known as the spin control's buddy. The idea is that the user holds down the left mouse button on the spin control to raise or lower the value in the edit control. The spin speed accelerates as the user continues to hold down the mouse button.
If your program uses an integer in the buddy, you can avoid C++ programming almost entirely. Just use ClassWizard to attach an integer data member to the edit control, and set the spin control's range in the OnInitDialog() function. You probably won't want the spin control's default range, which runs backward from a minimum of 100 to a maximum of 0. Don't forget to select Auto Buddy and Set Buddy Integer in the spin control's Styles property page. You can call the SetRange() and SetAccel() member functions in your OnInitDialog() function to change the range and the acceleration profile. If you want your edit control to display a non-integer, such as a time or a floating-point number, you must map the spin control's WM_VSCROLL (or WM_HSCROLL) messages and write handler code to convert the spin control's integer to the buddy's value.
The List Control
Use the list control (class CListCtrl) if you want a list that contains images as well as text. Figure 6-2 shows a list control with a "list" view style and small icons. The elements are arranged in a grid, and the control includes horizontal scrolling. When the user selects an item, the control sends a notification message, which you map in your dialog class. That message handler can determine which item the user selected. Items are identified by a zero-based integer index.
Both the list control and the tree control get their graphic images from a common control element called an image list (class CImageList). Your program must assemble the image list from icons or bitmaps and then pass an image list pointer to the list control. Your OnInitDialog() function is a good place to create and attach the image list and to assign text strings. The InsertItem() member function serves this purpose. List control programming is straightforward if you stick with strings and icons. If you implement drag and drop or if you need custom owner-drawn graphics, you've got more work to do.
The Tree Control
You're already familiar with tree controls if you've used Microsoft Windows Explorer or Visual C++'s Workspace view. The MFC CTreeCtrl class makes it easy to add this same functionality to your own programs. Figure 6-2 illustrates a tree control that shows a modern American combined family. The user can expand and collapse elements by clicking the + and - buttons or by double-clicking the elements. The icon next to each item is programmed to change when the user selects the item with a single click.
The list control and the tree control have some things in common: they can both use the same image list, and they share some of the same notification messages. Their methods of identifying items are different, however. The tree control uses an HTREEITEM handle instead of an integer index. To insert an item, you call the InsertItem() member function, but first you must build up a TV_INSERTSTRUCT structure that identifies (among other things) the string, the image list index, and the handle of the parent item (which is null for top-level items). As with list controls, infinite customization possibilities are available for the tree control. For example, you can allow the user to edit items and to insert and delete items.
The WM_NOTIFY Message
The original Windows controls sent their notifications in WM_COMMAND messages. The standard 32-bit wParam and lParam message parameters are not sufficient, however, for the information that a common control needs to send to its parent. Microsoft solved this "bandwidth" problem by defining a new message, WM_NOTIFY. With the WM_NOTIFY message, wParam is the control ID and lParam is a pointer to an NMHDR structure, which is managed by the control. This C structure is defined by the following code:
typedef struct tagNMHDR {
HWND hwndFrom; // handle to control sending the message
UINT idFrom; // ID of control sending the message
UINT code; // control-specific notification code
} NMHDR;
Many controls, however, send WM_NOTIFY messages with pointers to structures larger than NMHDR. Those structures contain the three members above plus appended control-specific members. Many tree control notifications, for example, pass a pointer to an NM_TREEVIEW structure that contains TV_ITEM structures, a drag point, and so forth. When ClassWizard maps a WM_NOTIFY message, it generates a pointer to the appropriate structure.
Continue on next module... part 4
Further reading and digging:
-
MSDN MFC 9.0 class library online documentation - latest version.
-
DCOM at MSDN.
-
COM+ at MSDN.
-
COM at MSDN.
-
Unicode and Multi-byte character set: Story and program examples.