| Tenouk C & C++ | MFC Home | MFC AppWizard 1 | Event Handling, Mapping Modes, and a Scrolling View 1 | Download | Site Index |
Module 2:
Getting Started with Visual C++ 6.0 AppWizard 2
This is a continuation from the previous module... Program examples compiled using Visual C++ 6.0 (MFC 6.0) compiler on Windows XP Pro machine with Service Pack 2. Topics and sub topics for this Tutorial are listed below:
-
Drawing Inside the View Window: The Windows Graphics Device Interface
-
The OnDraw() Member Function
-
The Windows Device Context
-
Adding Draw Code to the MYMFC Program
-
A Preview of the Resource Editors
-
The Contents of mymfc.rc file
-
Running the Dialog Resource Editor
-
Enabling the Diagnostic Macros
-
Two Ways to Run a Program
-
AFX Functions
-
Precompiled Headers Story
|
|
Compile and link the generated code. AppWizard, in addition to generating code, creates custom project and workspace files for your application. The project file, mymfc.dsp, specifies all the file dependencies together with the compile and link option flags. Because the new project becomes Visual C++'s current project, you can now build the application by choosing Build mymfc.exe from the Build menu (or by clicking the Build toolbar button) shown here.
Figure 14: Building mymfc.exe.
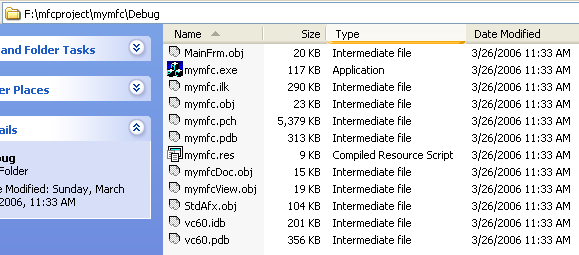
If the build is successful, an executable program named mymfc.exe is created in a new Debug subdirectory underneath \mfcproject\mymfc. The OBJ files and other intermediate files are also stored in Debug.
Figure 15: Files generated after the building process under the Debug directory.
|

Compare the file structure on disk with the structure in the Workspace window's FileView page shown here. The FileView page contains a logical view of your project. The header files show up under Header Files, even though they are in the same subdirectory as the CPP files. The resource files are stored in the \res subdirectory.

Figure 16: mymfc project FileView.
Test the resulting application. Choose Execute mymfc.exe from the Build menu. Experiment with the program. It doesn't do much because there is no coding yet. Actually, as you might guess, the program has a lot of features - you simply haven't activated them yet. Close the program window when you've finished experimenting.

Figure 17: Executing/running the mymfc.exe program.

Figure 18: mymfc program output.
The most important CMymfcView base classes are CWnd and CView. CWnd provides CMymfcView's "windowness," and CView provides the hooks to the rest of the application framework, particularly to the document and to the frame window.
Drawing Inside the View Window: The Windows Graphics Device Interface
Now you're ready to write code to draw inside the view window. You'll be making a few changes directly to the MYMFC source code.
The OnDraw() Member Function
Specifically, you'll be fleshing out OnDraw() in mymfcView.cpp. OnDraw() is a virtual member function of the CView class that the application framework calls every time the view window needs to be repainted. A window needs to be repainted if the user resizes the window or reveals a previously hidden part of the window, or if the application changes the window's data. If the user resizes the window or reveals a hidden area, the application framework calls OnDraw(), but if a function in your program changes the data, it must inform Windows of the change by calling the view's inherited Invalidate() (or InvalidateRect()) member function. This call to Invalidate() triggers a later call to OnDraw().
Even though you can draw inside a window at any time, it's recommended that you let window changes accumulate and then process them all together in the OnDraw() function. That way your program can respond both to program-generated events and to Windows-generated events such as size changes.
The Windows Device Context
Windows doesn't allow direct access to the display hardware but communicates through an abstraction called a "device context" that is associated with the window. In the MFC library, the device context is a C++ object of class CDC that is passed (by pointer) as a parameter to OnDraw(). After you have the device context pointer, you can call the many CDC member functions that do the work of drawing.
Adding Draw Code to the MYMFC Program
Now let's write the code to draw some text and a circle inside the view window. Be sure that the project MYMFC is open in Visual C++. You can use the Workspace window's ClassView to locate the code for the function and double-clicking the file to edit the OnDraw() function in mymfcView.cpp. So, find the AppWizard-generated OnDraw() function in mymfcView.cpp:
-----------------------------------------------------------------------------------------------
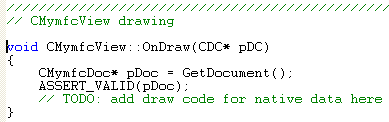
Listing 1: mymfc C++ code segment.
The following code replaces the previous code:
void CMymfcView::OnDraw(CDC* pDC)
{
// TODO: add draw code for native data here
// prints in default font and size, top left corner
pDC->TextOut(5, 0, "Hello MFC world!");
// selects a brush for the circle interior
pDC->SelectStockObject(GRAY_BRUSH);
// draws a gray circle 100 units in diameter
pDC->Ellipse(CRect(0, 20, 100, 120));
}
You can safely remove the call to GetDocument() because we're not dealing with documents yet. The functions TextOut(), SelectStockObject() and Ellipse() are all member functions of the application framework's device context class CDC. The Ellipse() function draws a circle if the bounding rectangle's length is equal to its width. The MFC library provides a handy utility class, CRect, for Windows rectangles. A temporary CRect object serves as the bounding rectangle argument for the ellipse drawing function.
Recompile and test MYMFC. Choose Build mymfc.exe sub menu from Build menu and if there are no compile errors, test the application again. Now you have a program that visibly does something!

Figure 19: mymfc program output.
A Preview of the Resource Editors
Now that you have a complete application program, it's a good time for a quick look at the resource editors. Although the application's resource script, mymfc.rc, is an ASCII file, modifying it with a text editor is not a good idea. That's the resource editors' job.
The Contents of mymfc.rc
The resource file determines much of the MYMFC application's "look and feel." The file mymfc.rc contains (or points to) the Windows resources listed here. You can open the rc file with text editor.
|
Resource |
Description |
|
Accelerator |
Definitions for keys that simulate menu and toolbar selections. |
|
Dialog |
Layout and contents of dialog boxes. MYMFC has only the About dialog box. |
|
Icon |
Icons (16-by-16-pixel and 32-by-32-pixel versions), such as the application icon you see in Microsoft Windows Explorer and in the application's About dialog box. MYMFC uses the MFC logo for its application icon. |
|
Menu |
The application's top-level menu and associated pop-up menus. |
|
String table |
Strings that are not part of the C++ source code. |
|
Toolbar |
The row of buttons immediately below the menu. |
|
Version |
Program description, version number, language, and so on. |
|
Table 3: Project resources. |
|

Figure 20: mymfc files in ResourceView.

Figure 21: mymfc resource file (RC).
In addition to the resources listed above, mymfc.rc contains the statements:
#include "afxres.h"
#include "afxres.rc"
Which bring in some MFC library resources common to all applications. These resources include strings, graphical buttons, and elements needed for printing and OLE. If you're using the shared DLL version of the MFC library, the common resources are stored inside the MFC DLL. The mymfc.rc file also contains the statement:
#include "resource.h"
This statement brings in the application's three #define constants, which are:
|
Object ID |
Meaning |
|
IDR_MAINFRAME |
Identifying the menu, icon, string list, and accelerator table. |
|
IDR_MYMFCTYPE |
Identifying the default document icon, which we won't use in this program. |
|
IDD_ABOUTBOX |
Identifying the About dialog box. |
|
Table 4. |
|
This same resource.h file is included indirectly by the application's source code files. If you use a resource editor to add more constants (symbols), the definitions ultimately show up in resource.h. Be careful if you edit this file in text mode because your changes might be removed the next time you use a resource editor.
Running the Dialog Resource Editor
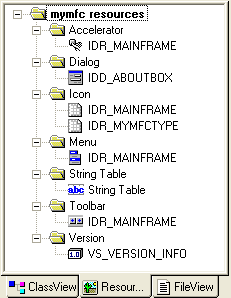
Open the project's RC file. Click the ResourceView button in the Workspace window. If you expand each item, you will see the following in the resource editor window.
|
Figure 22: mymfc's resources in ResourceView |
|
Examine the application's resources. Now take some time to explore the individual resources. When you select a resource by double-clicking on it, another window opens with tools appropriate for the selected resource. If you open a dialog resource, the control palette should appear. If it doesn't, right-click inside any toolbar, and then check Controls.
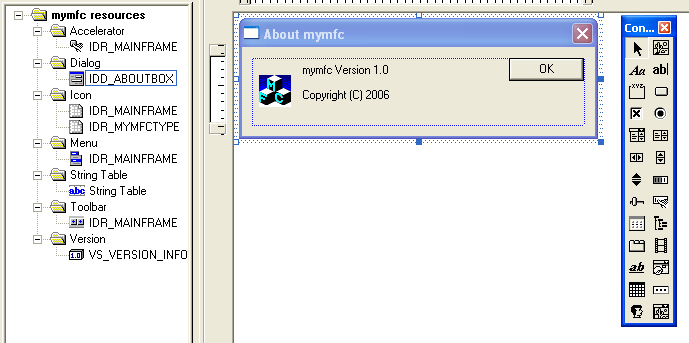
Figure 23: IDD_ABOUTBOX dialog in resource editor.
Modify the IDD_ABOUTBOX dialog box by making some changes to the About mymfc dialog box, shown here.
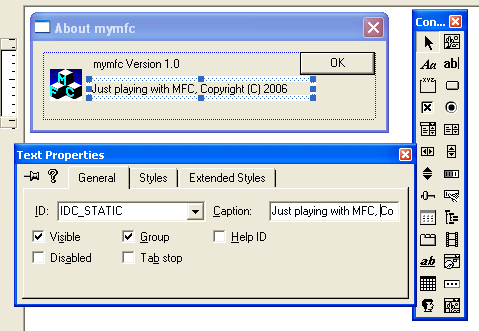
Figure 24: Changing the About dialog properties.
You can change the size of the window by dragging the right and bottom borders, move the OK button, change the text, and so forth. Simply click on an element to select it, and then right-click to change its properties.
Rebuild the project with the modified resource file. In Visual C++, choose Build mymfc.exe from the Build menu. Notice that no actual C++ recompilation is necessary. Visual C++ saves the edited resource file, and then the Resource Compiler (rc.exe) processes mymfc.rc to produce a compiled version, mymfc.res, which is fed to the linker. The linker runs quickly because it can link the project incrementally.
Test the new version of the application. Run the MYMFC program again, and then choose About from the application's Help menu to confirm that your dialog box was changed as expected.

Figure 25: mymfc program output.
Win32 Debug Target vs Win32 Release Target
If you open the drop-down list on the Build toolbar, you'll notice two items: Win32 Debug and Win32 Release. The Build toolbar is not present by default, but you can choose Customize from the Tools menu to display it.
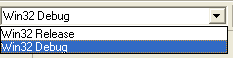
Figure 26: Release vs Debug target.
These items are targets that represent distinct sets of build options. When AppWizard generates a project, it creates two default targets with different settings. These settings are summarized in the following table.
|
Option |
Release Build |
Debug Build |
|
Source code debugging |
Disabled |
Enabled for both compiler and linker |
|
MFC diagnostic macros |
Disabled (NDEBUG defined) |
Enabled (_DEBUG defined) |
|
Library linkage |
MFC Release library |
MFC Debug libraries |
|
Compiler optimization |
Speed optimization (not available in Learning Edition) |
No optimization (faster compile) |
|
Table 5. |
||
You develop your application in Debug mode, and then you rebuild in Release mode prior to delivery. The Release build EXE will be smaller and faster because of the optimization and assuming that you have fixed all the bugs. You select the configuration from the build target window in the Build toolbar or Build minibar.

Figure 27: Build toolbar and minibar.
By default, the Debug output files and intermediate files are stored in the project's Debug subdirectory; the Release files are stored in the Release subdirectory. You can change these directories (and other project settings as well) on the General tab in the Project Settings dialog box.

Figure 28: Visual C++ project settings.
You can create your own custom configurations if you need to by choosing Configurations from Visual C++'s Build menu.
Enabling the Diagnostic Macros
The application framework TRACE macros are particularly useful for monitoring program activity. They require that tracing be enabled, which is the default setting. If you're not seeing TRACE output from your program, first make sure that you are running the debug target from the debugger and then run the TRACER utility. If you check the Enable Tracing checkbox, TRACER will insert the statement:
TraceEnabled = 1
in the [Diagnostics] section of a file named Afx.ini. (No, it's not stored in the Registry.) You can also use TRACER to enable other MFC diagnostic outputs, including message, OLE, database, and Internet information.
AFX Functions
Not all of the functions that MFC offers are members of classes. MFC provides an API of sorts all its own in the form of global functions whose names begin with Afx. Class member functions can be called only in the context of the objects to which they belong, but AFX functions are available anytime and anywhere.
The following table lists some of the more commonly used AFX functions. AfxBeginThread() simplifies the process of creating threads of execution. AfxMessageBox() is the global equivalent of the Windows MessageBox() function and, unlike CWnd::MessageBox, can be called just as easily from a document class as from a window class. AfxGetApp() and AfxGetMainWnd() return pointers to the application object and the application's main window and are useful when you want to access a function or data member of those objects but don't have a pointer readily available. AfxGetInstanceHandle() is handy when you need an instance handle to pass to a Windows API function. Even MFC programs call API functions every now and then! The following Table list the commonly use Afx functions.
|
Function Name |
Description |
|
AfxAbort() |
Unconditionally terminates an application; usually called when an unrecoverable error occurs. |
|
AfxBeginThread() |
Creates a new thread and begins executing it. |
|
AfxEndThread() |
Terminates the thread that is currently executing. |
|
AfxMessageBox () |
Displays a Windows message box. |
|
AfxGetApp() |
Returns a pointer to the application object. |
|
AfxGetAppName() |
Returns the name of the application. |
|
AfxGetMainWnd() |
Returns a pointer to the application's main window. |
|
AfxGetInstanceHandle() |
Returns a handle identifying the current application instance. |
|
AfxRegisterWndClass() |
Registers a custom WNDCLASS for an MFC application. |
|
Table 6 |
|
Precompiled Headers Story
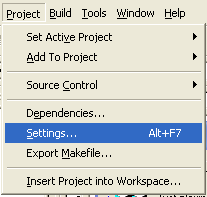
Figure 29: Invoking the Visual C++ project settings dialog.

Figure 30: Visual C++ project settings dialog.
When AppWizard generates a project, it generates switch settings and files for precompiled headers. You must understand how the make system processes precompiled headers in order to manage your projects effectively. Visual C++ has two precompiled header "systems:" automatic and manual. Automatic precompiled headers, activated with the /Yx compiler switch, store compiler output in a "database" file. Manual precompiled headers are activated by the /Yc and /Yu switch settings and are central to all AppWizard-generated projects. Precompiled headers represent compiler "snapshots" taken at a particular line of source code. In MFC library programs, the snapshot is generally taken immediately after the following statement:
#include "StdAfx.h"
The file StdAfx.h contains #include statements for the MFC library header files. The file's contents depend on the options that you select when you run AppWizard, but the file always contains these statements:
#include <afxwin.h>
#include <afxext.h>
If you're using compound documents, StdAfx.h also contains the statement:
#include <afxole.h>
And if you're using Automation or ActiveX Controls, it contains:
#include <afxdisp.h>
If you're using Internet Explorer 4 Common Controls, StdAfx.h contains the statement:
#include <afxdtctl.h>
Occasionally you will need other header files - for example, the header for template-based collection classes that is accessed by the statement:
#include <afxtempl.h>
The source file StdAfx.cpp contains only the statement:
#include "StdAfx.h"
And is used to generate the precompiled header file in the project directory. The MFC library headers included by StdAfx.h never change, but they do take a long time to compile. The compiler switch /Yc, used only with StdAfx.cpp, causes creation of the precompiled header (PCH) file. The switch /Yu, used with all the other source code files, causes use of an existing PCH file. The switch /Fp specifies the PCH filename that would otherwise default to the project name (with the PCH extension) in the target's output files subdirectory. Figure 31 illustrates the whole process.
AppWizard sets the /Yc and /Yu switches for you, but you can make changes if you need to. It's possible to define compiler switch settings for individual source files. On the C/C++ tab in the Project Settings dialog box, if you select only StdAfx.cpp, you'll see the /Yc setting. This overrides the /Yu setting that is defined for the target.
Be aware that PCH files are big - 5 MB is typical. If you're not careful, you'll fill up your hard disk. You can keep things under control by periodically cleaning out your projects' Debug directories, or you can use the /Fp compiler option to reroute PCH files to a common directory.

Figure 31: The Visual C++ precompiled header process.
Two Ways to Run a Program
Visual C++ lets you run your program directly (by pressing Ctrl-F5) or through the debugger (by pressing F5). Running your program directly is much faster because Visual C++ doesn't have to load the debugger first. If you know you don't want to see diagnostic messages or use breakpoints, start your program by pressing Ctrl-F5 or use the "exclamation point" button on the Build toolbar.
Further reading and digging:
-
MSDN MFC 9.0 class library online documentation - latest version.
-
DCOM at MSDN.
-
COM+ at MSDN.
-
COM at MSDN.
-
Unicode and Multibyte character set: Story and program examples.